 | |||||||||||||||||||||||||||||||||||||||||
 |
 |
 |
 |
 |
 |
 |
 |
||||||||||||||||||||||||||||||||||
|
Home > Bridge Construction Set > Manual > Advanced Bridge Building Advanced bridge building techniques Obviously, the Complex building mode gives the player a lot more freedom, so it's the mode of choice for advanced Bridge Construction Set players. Also, turning on the high resolution grid ('GridHD', Hotkey G) is highly recommended. Learn to navigate the building planes In the game, space consists of vertical layers, or 'planes', that you 'draw' your bridge on. The planes are stacked one behind another. You have probably noticed how the game always builds two beams whenever you connect two joints - the bridge structure on the editing plane gets copied to another plane behind it, and two thin crossbeams appear in between. The complex mode gives you full control of where the beams get placed. You can turn the mirroring function on and off, and also move both the editing plane and the plane your beams get mirrored to - separately. It is important to understand how this works in order to solve most Complex and Extra levels of the game. This should help you get started: Usually, a bridge is one deck piece wide. This means that you have two planes for the 'front' and 'back' bridge layers and one 'center' plane in between. Let's give the planes numbers and make the center plane, say, number 5. In Normal (simple) mode, the editing plane is always the one right in front of the center one, that means it's number 4. The rear plane that everything gets mirrored to is obviously number 6. 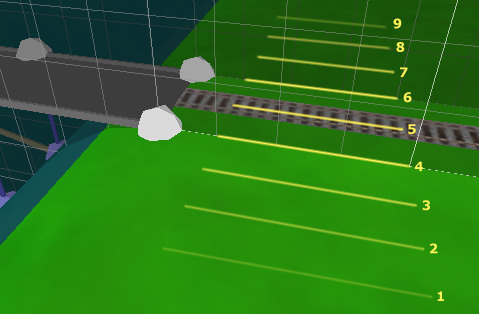
Now, in Complex mode, you can move the editing plane forward and back using the R and F keys respectively. Try turning the 'mirrored' plane display on by clicking on 'ShowMirror'. It's important to notice how the the mirror plane always moves in the opposite direction, so when you move the editing plane back one step so that it becomes number 3, the mirror plane moves forward to become number 7, etc. The distance between the two planes is shown on the right (e.g. 'Mirror 4'). 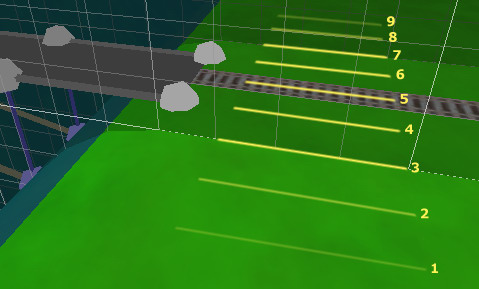
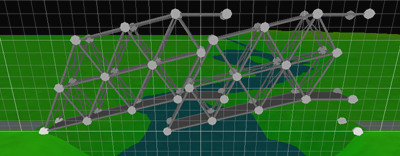
As you probably already guessed - of course, you can move the mirror plane manually as well. Use Ctrl-R and Ctrl-F to do that. You'll see how the mirror plane moves independently. Try placing some beams using different plane distances to get a good feeling for the depth or Z-dimension. You can also move both the editing and mirror planes together using Shift-R and Shift-F. Obviously, the distance between them remains constant while you do that, which can be quite handy for multi-lane bridges. If for some reason you feel lost and can't seem to get the planes where you want them, you can always hit Space to make the mirror plane return to 2 steps behind the editing plane. Of course, you can turn off the mirroring function entirely by clicking on 'Mirror' or pressing M. You probably won't do that too often, but it's a quick way to delete a single beam without deleting its mirror image. Use the thin beams Version 1.2 UPDATE: Thin beam toggle Version 1.2 makes it easy to build with thin beams: In complex editing mode press the Tab key to toggle thin beam building mode. All materials that can build thin beams will have an X after the material name when thin beam mode is on. For example Iron changes to IronX when thin beam mode is active. As you know, the game always puts thin crossbeams between every pair of normal ones to make the bridge rigid and keep it from falling over just because of a wind blow or the water current. Those thin beams can actually be seen as extra kinds of material, since they are thinner and cheaper than normal beams. The game doesn't let you place them where you want in a convenient way, but with the right technique, you can actually still put them anywhere. 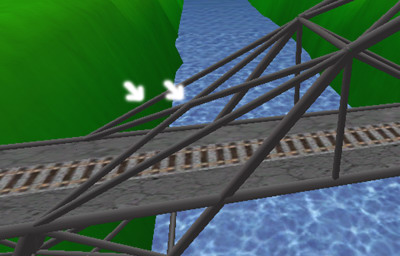
This is actually only important if you are trying to make your bridge as cheap as possible and maybe even set a new record, but it might also help you beat some difficult levels, since you can save money by using thin beams in some not-so-critical spots. The trick you have to do is actually pretty simple: either place a normal pair of beams, then turn mirroring off and delete the frame, leaving just the thin 'X', or, if you need thin parallel beams, just put the normal beams where the crossbeams would go (forming an 'X'), and then delete the X right after that. You can also combine those two steps if you need a thin frame with a thin X inside it. 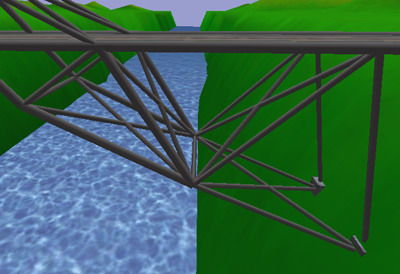
The trickiest part is building a 'V' shape out of thin beams. One way to achieve that is to move the mirror plane right next to the editing plane (so that the distance meter says '1') and then simply place a normal beam. You'll get one normal beam on the editing plane and one thin beam that connects both planes. Just repeat this on the opposite side if needed to complete the 'V' shape (you might need to actually put the mirror plane in front of the editing plane, just experiment with different settings!) 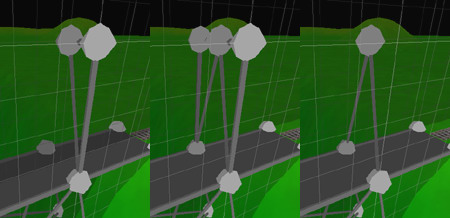
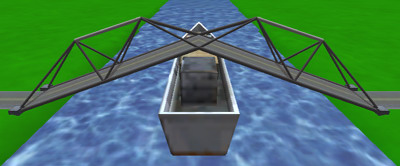
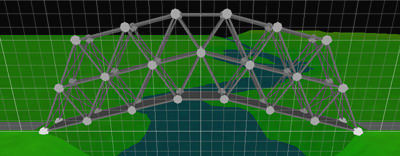
Remember that different materials have different strength, which also applies to the thin beams. For example, thin steel beams are actually stronger than normal iron beams, so they offer a neat intermediate step between iron and steel in terms of cost and stability. Remember you can build steel framed decks and arch-shaped decks Well, this one might be pretty obvious to many of you, but it's indeed very helpful to remember: especially when building bridges for cars or trucks, giving the deck an arched shape makes it a lot stronger and therefore saves you money. You can even often avoid building a drawbridge if you make the arch high enough for the ship(s) to go underneath! 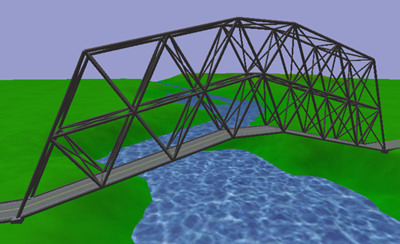
Also, whenever steel is available, remember you can build steel-framed decks in Complex mode. Think three-dimensional! Although the game interface helps greatly simplify the building of 3D bridges, almost reducing everything to 2 dimensions, a good bridge builder should always try to use the third dimension to his advantage. Using the center plane a lot can save you a lot of money since you don't have to build 2 copies of everything. 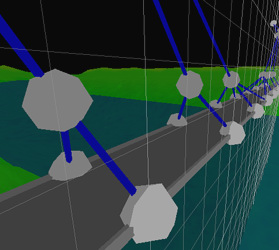
Make use of the copy & paste functions An extremely nice functionality of the game is the copy & paste combo, combined with the 'Flip X' modifier. It's really easy to use, too: just drag the mouse cursor to select any part of the bridge (the editing and mirror planes mark the boundaries of your selection in the Z-dimension). Press C to copy the bridge section to the game's internal 'clipboard'. You'll also notice a copy of it sticks to your mouse cursor. You can place copies of your selection anywhere by clicking the left mouse button. And the best thing is, you can flip them (in the X-dimension) using the X key. This way, in case you plan on building a symmetrical bridge, you only have to build one half of it - you can copy & flip it to create the other half! 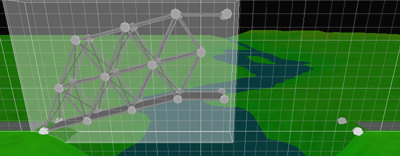
To stop pasting copies, just click the right mouse button. You can paste more copies later by pressing the V key. The bridge section you had selected will be kept 'on the clipboard' until you overwrite it with another one - which, by the way, means you can transfer anything between different levels! Back to the main page | ||